|
Introduction
Bill is a Northern California artist and an instructor at DeAnza College. We like this article because it speaks to the beginner to intermediate aspiring potter. It is clearly written and easy to understand. We asked Bill if we could add photos and feature it in our learning center so all of our visitors could enjoy it. We appreciate Bill's generosity and hope you find at least one thing in this article to help you become a better potter faster.
You can check out Bill's page at: http://kilnman.fhda.edu
Basic Throwing
by Bill Geisinger
Beginning potters who doubt their ability to throw, or believe that throwing ability is an innate talent rather than a learned skill, should be pleased to know that history shows without question that nearly anyone can become proficient at throwing on the potter's wheel.
Because of their inexperience, beginning potters may assume that most of the problems they encounter while throwing are the result of a lack of skill. To improve their skills, beginners should be concerned with the advantages and disadvantages of the various tools, equipment, and materials used for throwing. At times a simple adjustment in tools, equipment, or materials will solve a problem.
Tools of the trade
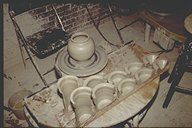
There are many tools available to aid throwing techniques. A basic group of tools for beginning potters might include the following:
- Elephant ear sponges for adding or removing water
- Wood modeling tools or pencils for incising and for undercutting the base of a piece of ware prior to removing it from a wheel head
- Wood ribs with one curved and one straight side to use in place of the fingers for pulling, flattening, or straightening a surface
- Needle tools with the wood end sharpened for cutting and incising
- Cutting wire or string for removing a piece of ware from a wheel head
There are a number of commercially manufactured tools which you can add to this list as needed, and you can improvise with common items such as pencils, dish sponges, etc. Personal experimentation will help you decide which tools and materials work best for your own needs.
Clay bodies
The clay body selected for throwing is as important as the type of wheel and wheel head used. There are three general groups of clay bodies - red or white earthenware, stoneware, and porcelain. Stoneware usually has the best working properties. Because it is not always as workable as an earthenware body, and porcelain is generally considered a poor clay to use when learning to throw.
Wedging the clay
After selecting a clay, you must wedge (knead) it to remove air bubbles and insure uniform consistency. A clay body that has been mixed properly and extruded from a de-airing pug mill is homogeneous, and because a vacuum removes most of the air, it does not usually need as much wedging for its first use.
There are two common kinds of wedging, the cut wedging method associated with potters in the Western world and the spiral wedging method associated with potters in the Eastern world. The spiral method is more efficient, particularly when wedging a large chunk of clay, but the spiral method does take longer to learn. Cut wedging is only successful when the clay is very soft, so it is only recommended if you are mixing a very wet and a very dry chunk of clay for later use.
Spiral wedging
The spiral wedging method has three main steps:
1. Push a cone of clay away from your body on a horizontal surface with the heels of your hands (the left hand does most of the work).
2. A thick slab of clay is created by this pressure. Partially roll this slab of clay back onto the cone with a twisting motion of your hands.
3. Repeat the process.
With each pushing motion, the tip and lower surface of the cone are partially squeezed off, leaving the form with less mass. When the rolling action takes place, new mass is added to the form.
Cut wedging
Cut wedging has two steps:
1. Cut a chunk of clay in half with a wire that is attached diagonally between a horizontal and a vertical surface.
2. Slap half of the clay, cut face down on the horizontal surface. Throw the other half of clay, cut face up on top of the first half. Repeat this step until the lumps, soft spots, and air pockets are removed from the clay.
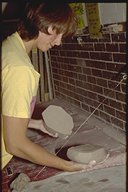
Preparing the wheel head
Prepare the wheel head for throwing by applying a thin film of water or slip with your hand (wetting the wheel head is particularly useful when the clay is rather hard; when soft clay is used, this step is not necessary). Next, place a lump of clay on the wheel head and twist it back and forth until it is firmly secured. If there is too much water on the wheel head, it will take a long time to seat the clay.
Beginners should use soft clay, because it is easier to work with during most of the throwing operations. If the clay is too stiff to work with, you can dip it in a bucket of water and wrap it in plastic or wet cloth. You can also cut stiff clay into chunks and sprinkle it with water to soften it. If the clay is wet enough, it can be re-wedged. If not, you can wet it again, wrap it in plastic, and stored it until it is softened.
To attach clay to the wheel head without applying a film of water, press or throw a lump of clay onto the surface as close to center as possible. As the wheel rotates slowly, firmly slap the lump into relative center. No lubrication (water) is applied to the clay during this step. Peaks and valleys on the surface of the lump should be smoothed with firm, rhythmic slaps, and the overall contour of the clay should be forced into a symmetrical shape. If this is difficult, the clay is probably too hard. Only when the clay is firmly secured to the wheel head and relatively in center are you ready to begin the centering process.
Click here to go on to part 2 of this article
|