Basic Throwing - Part 2
Centering the clay

The theory of centering is simple. A lump of malleable material (clay) is placed on a revolving surface (wheel head), forced into a symmetrical form by contact with a fixed object (the hands), and lubricated to reduce friction. Most beginners have difficulty with centering because they release their hands from the fixed position suddenly, thus affecting only a portion of the revolving surface of the clay. You have to concentrate on releasing the hand pressure slowly, so that the clay is not thrown off center.
The leverage which results from your hand-arm-body position is particularly important for centering and is far superior to brute strength. The heel of your hand, because it is the least flexible surface of the hand and the most resistant to the pressure of the moving clay, is used to apply pressure during centering. Your arms are tucked against your body for support. If you allow your elbows to move freely away from your body, you will loose leverage. By positioning your upper torso over the wheel head, you can use your body as a point of leverage and a bracing surface. There are, of course, many potters who are able to throw successfully in other positions; however, other positions require more physical strength. As a beginner you will achieve better control in the braced position.
The centering process
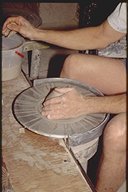
1. Attach a grapefruit-size mass of clay to the wheel head, and slap it into relative center.
2. Lubricate the clay with water, and increase the wheel speed to about 160 rpm (or as fast as the wheel will comfortably rotate). Periodical lubrication allows your hands to slide smoothly over the surface of the hump. Keep the clay evenly lubricated, but work toward the eventual reduction of the amount of water used. An elephant ear sponge is a good choice for transferring water to the revolving clay.
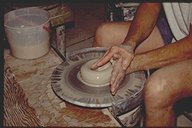
3. Begin by repeatedly exerting upward and inward pressure from the bottom to the top of the clay. Centering pressure involves more than simply pushing the clay. Opposing muscles of the arms and hands are tensed against each other to stabilize the hand contact surface - and are gradually relaxed after the hump is centered. The best leverage is attained when your upper arms or elbows are pressed against your body to eliminate unnecessary movement. Avoid learning to center with one or both of your arms resting on the splash pan, boards, or other structures attached to the wheel. Although this practice may seem to increase control at first, it will be limiting later when you try to center larger amounts of clay.
The base of the hump is more difficult to control because the wheel head interferes with your hand pressure. Also, if a heavily grogged clay is being used, the abrasive nature of the clay may make working with this portion of the hump uncomfortable. To minimize the discomfort, use your fingers to apply pressure to the base of the hump, or hold a sponge between your fingers and thumb to align this surface. The sponge will protect your fingers from the abrasive particles on the wheel head while distributing water evenly on the surface of the clay ball.
There are three common problems encountered when centering:
1. If the clay is being forced to move too fast and cones up quickly, it may break off in your hands. Insufficient or uneven lubrication can also cause breakage. There are limits to what clay can do, and beginners must learn to restrict pressure, speed, and friction to meet the demands of the clay. (Broken off clay should not be replaced on the hump. Instead, it should be re-wedged later with other clay scraps.)
2. A hollow can form in the center of the hump as it is being raised. To correct this, press down on the rim of the hollow while maintaining the diameter of the hump; this pressure will force clay up from the bottom of the hollow. Then, collar the form by applying pressure on the outside of the hump. Repeat both processes until the hump forms a point. Avoid trapping soft clay, slip, or air in the hollow as it is being closed.
3. The clay can move off center. If, during centering, the clay is forced two inches or more off the midpoint of the wheel head, stop the wheel and return the hump to relative center. Begin the centering process again.
Successful centering is the result of practice and concentration, but beginners have a tendency to underrate the importance of this process because it does not produce a finished product. It is tempting to rush through this preparation and "make something." However, centering is extremely important. Failure to center the clay will impair all phases of throwing that follow. Specifically, it will cause the thrown form to collapse from the centrifugal force of rotation, or it will produce an uneven wall thickness and height, which are difficult to manage.
Alternative centering methods
You can use different methods of centering when throwing large amounts of clay and/or wide-based forms. Because most hands will not cover the entire surface of large humps, more strength or leverage is needed to manage these forms. Consequently, the clay is manipulated from the bottom to the top of the hump - pressure is applied and your hands move slowly upward as the clay below is centered. The release of pressure is gradual, and the process is repeated until the entire hump is in center.
Two common centering methods call for opposing one hand's pressure against the other at three and nine o'clock or at seven and one o'clock, with the clay between the hands (hand positions are often discussed as if the wheel head were a clock face). When using the former method, your upper arms may be pressed against your torso; when using the later method, your left elbow may be tucked against your abdomen and your upper right arm pressed against your torso. Pull the hump toward you with your right hand and force it away with your left. This method offers much more leverage because your back muscles and arms work together to apply force. Once the sides of the large hump are in center, you can center the top with downward pressure from one or both hands.
It is a good idea to master the centering process with small amounts of clay before moving on to large amounts. There are many possibilities for centering, and when choosing a centering method you should consider leverage, adaptability for all quantities of clay, comfort, and personal preference. It is encouraging to find a method that works well and feels relatively comfortable when you are learning to center on the potter's wheel.
Opening the clay (forming a hollow)
Most conventional throwing involves the production of hollow forms, and the rotating, centered clay must be "opened" by one or more methods. The mechanics of opening are relatively simple - a centered hole is forced into the hump to a suitable depth, leaving enough clay beneath the opening for the base of the pot. The hollow thus forms the beginning of the interior shape and wall thickness.
There are two steps to forming a hollow:
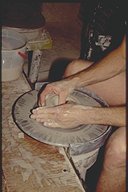
1. Press one or both thumbs, or a combination of fingers, into the center of the hump. To avoid the formation of a peak at the bottom of the hollow, apply pressure directly to the middle of the rotating hump.
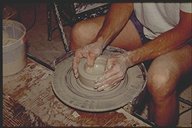
2. After reaching the desired depth, expand the hollow to form a flat or slightly curved bottom. The bottom of the hollow is usually opened slightly larger than at the neck, leaving a ridge inside which helps the upward movement of the clay when the first pull is made.
Hints for successful openings
* Opening is performed at the same wheel speed used for centering, and it also involves the tensing of opposing sets of muscles when pressure is applied. The pressure used to open the clay should be sure and even, and the downward movement should be direct, smooth, and relatively fast. With the exception of the dimpling action, opening is usually accomplished with one continuous motion; then pressure is relaxed and the hand removed. Opening is a natural motion, because the centrifugal force of the rotating clay helps guide you in achieving a completely centered hollowing of the form. Quick or jerky movement, particularly at the release of pressure, often results in an asymmetrical and thus undesirable opening.
* If the clay is poorly wedged, you may find it difficult to make an opening in the center. If you have this problem, the clay should be re-wedged before further use.
* When you use your thumbs to open the hump, the depth of the opening is limited to the length of your extended thumb. So this method will only produce small or shallow forms, or it can be used for opening the centered clay before further opening with your fingers.
Opening with the fingers is perhaps the most common method because it is unrestricted - all sizes of forms can be produced and only one method need be learned. With this technique, your fingers are generally tensed together, and the fingertips are sometimes grouped in an even line. Some potters brace or support one hand with the other (right-handed potters may find it easier to open with the left hand and brace with the right). The thumb is sometimes used to brace the opening action of the fingers. If so, your thumb and fingertips are grouped together as if trying to pick up a few grains of sand.
* Point the hand that exerts most of the opening pressure in the same direction as the rotating clay. This helps prevent snags or digs in the hump, which throw the form off center.
* Lubricate evenly. Some potters prefer to hold a sponge in the opening hand to control lubrication and reduce friction.
* Form a small, shallow depression (sometimes referred to as a dimple) at the top of the hump. This depression serves both as a guide for further opening and as a container for water to lubricate the opening action. This step is usually eliminated as potters becomes more proficient, but it can be useful for beginners, particularly to insure adequate lubrication.
* To form a stronger wall, use a thin clay slip to lubricate the clay in place of clear water. Slip contains less water, and the less water absorbed by the hump, the stronger the walls. This is particularly advantageous to beginners, because they tend to overwork the clay.
As you become more experienced, you will find the centering and opening action flowing together, so that they are not separate steps in the throwing process but rather are continuous patterns of movement. Some experienced potters use withdrawal from opening as the first pull of the clay wall. In this case, the thumbs or fingers move outward from center when they reach the desired depth, and the clay is squeezed as the hand is withdrawn.
Click here to go on to Part 3 of this article