Basic Throwing - Part 4
Completing the form
When a successful form is pulled, it is completed with refinements of the lip (also called the rim) and removal from the wheel head. During both of these activities, speed of rotation varies according to the stability of each shape thrown - greater stability allows faster rotation. Horizontal ware, such as bowls, will require a considerably slower speed. Fifty rpm is a starting point to experiment with for slow rim refinement.
Refining the rim

Once the shape of the rim is defined, it is finished with a wet chamois, a wet sponge, or a lubricated finger. The finishing action leaves a smooth clay surface and may also make subtle adjustments in lip thickness and shape. Uniform lubrication is important for maintaining a centered rim during finishing.
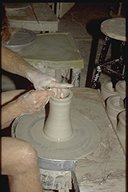
Cutting from the wheel head
When you are satisfied with the completed shape, cut it from the wheel head or hump. Throwing all ware on bats will temporarily avoid the problem, but you will eventually need to learn to lift ware from the wheel head to develop full use of your throwing skills.
Most potters undercut the outside bottom of the wall before slicing below the base. The undercut provides a ledge that helps you lift the form and may also serve to complete the base if you don't want a foot rim. To undercut a form:
1. Slowly guide a lubricated wood tool or pencil into the rotating clay, beginning at a point which corresponds to the inside bottom of the pot. With practice, you will be able to determine the proper point of entry for undercutting by simultaneously sighting the inside bottom and the point of the wood tool.
2. Line up the two on a horizontal plane, using simple depth perception, and allow the point of the tool to make gentle contact with the wall. Cut a shallow incised ring around the outside base. Use the ring as a guide for starting the undercut. The cut is made at a 45 degree angle.
Note: Be careful to keep the tool in its original groove rather than cutting a number of incisions; holding the tool with two hands will help to steady it.
To cut the form from the wheel head:
1. Pass a tightly stretched wire (string or fishing line may also be used) under the ware at the bottom of the undercut. Production techniques usually require that this action be performed while the wheel rotates, but it may be easier for beginners if the wheel is stopped. In another version of the cutting technique, string is laid against the bottom of the undercut while the form slowly rotates.
2. When it encircles the pot, pull the string. The wheel's rotation helps cut the ware free.
Regardless of the method employed, all cutting motions should be strictly horizontal to avoid a foot which is thick on one side and thin on the other.
If the wire accidentally cuts a hole through the base, it is possible to force the cut together again with throwing pressure on the inside bottom of the form. Then another lower cut can be made with the wire if there is enough clay for a base below the form.
Remove completed shapes after successful cutting. You may use your fingers, manufactured or homemade pot lifters, or, if the shape has been dryly thrown, you can use the flat of your hands (as if warming them on a coffee mug). Horizontal or unstable forms which are thrown on bats are cut and left to firm before removal. With practice, you will be able to cut stable, small- or medium-sized forms as the wheel turns, otherwise, a gentle twist frees the form from the stationary wheel head.
When the form has been lifted to a ware board for drying, you can correct any warpage by exerting pressure at the base of the elongated axis. This forces the walls and rim back to the original circular shape.
If you feel like a throwing problem cannot be solved, keep practicing. Learning to throw involves reaching occasional plateaus where there may be an almost complete lack of progress, but these periods will pass. Practice and observation are the keys to throwing skill.