|
|
A step by step look at a pit-fire
Like many studio potters, most of my experience is with high fire glazes in gas kilns and recently some experience with mid range glazes in electric kilns. Sure I've had fun in the raku pit but I've never been bitten by the bug. However, I recently discovered a pent up desire to pit-fire. When a friend with a large beautiful property in lush Haiku Hawaii asked me to research and try one in a natural pit she had found on her property, I happily agreed.
Clay bodies, burnishing
We researched clay bodies and choose a Solodate 60 clay body since it is a fairly strong and shock resistant cone 10 clay. I threw pots with a primitive look and feel and carved out designs. When they were just past leather hard I burnished them with a smooth polished rock. The burnishing can be a rewarding albeit slow and laborious process. You can take pleasure in raising a shine out of a lifeless matt surface. When you burnish the surface of your pottery it becomes sealed as the clay platelets align.
Terra Sigilatta preparation and application
Next we mixed up a terra sigilatta slip to apply to the pottery. Terra sigilatta means 'earth sealed' in Latin and it is a mix of fine clay particles from a simple three ingredient recipe. It's either red art clay powder or grolleg white clay powder mixed with water and a defocullant like darvan or calgon which keeps the particles in suspension.
Jennifer Owen at the Hui Noeau was generous share her easy recipe with us. We mixed a batch of red and white terra 'sig' so we could try both. Both recipes follow. First you mix the ingredients together in a blender for one minute, let them sit for 30 minutes then mix again for one minute. Then let sit overnight up to 48 hours. When you come back to it, you will find three distinct layers. The top layer will be clear and is water which can be syphoned off carefully with a sponge. The middle layer is the fine clay particles of the terra sig slip we want to collect. Pour this off into a separate container. Then discard the sludge layer at the bottom.
The terra sigilatta recipe we used is best applied to bone dry burnished ware. It worked especially well when we brushed it on a small area then did a second burnishing. We researched and found one potter online recommended a thin plastic Safeway bag for burnishing the terra sig onto the bone dry ware. So, we applied terra sig to a small area of the pot, then immediately rubbed the area with a Safeway bag over our fingers. This way, we got the best shine with the least effort. To get a really great shine, it is a labor intensive process so this is a great technique to know about.
Recipes
115 grams red art clay (powder)
2 cups water
one drop defocculant (darvon or calgon)
115 grams grolleg white clay (powder)
2 cups water
one drop defocculant (darvon or calgon)
*optional we added a small amount of red iron oxide to each recipe for color
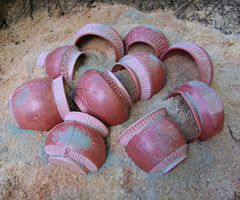
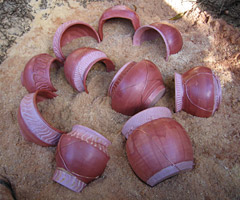
 We applied both the white and red terra sig to the same pottery and bisque fired to cone 015 (1479 degrees) in an electric kiln. This is a lower temperature bisque and we chose this to encourage more shine. If we went to cone 08 (1751 degrees) we would definitely see less shine. When the pots came out of the bisque we were pleased to see they were really shiny. We applied both the white and red terra sig to the same pottery and bisque fired to cone 015 (1479 degrees) in an electric kiln. This is a lower temperature bisque and we chose this to encourage more shine. If we went to cone 08 (1751 degrees) we would definitely see less shine. When the pots came out of the bisque we were pleased to see they were really shiny.
Next it's time to gather your materials for the pit firing. This is also a labor intensive process.
You will need:
sawdust (must be dry)
kindling and medium sized logs (a hardwood is desirable, in Hawaii we used keawe since it burns long and slow)
rock salt
copper carbonate
*optional copper wire
When it came time to build a fire I consulted a local fireman and potter, Rob Spencer. Rob assisted David Kuraoka a nationally known ceramic artist who specializes in this technique and has offered workshops on Maui at the Hui Noeau.
Preparing the pit
We looked at the pit and the amount of ware. For only ten medium sized (8 x 8) pieces, we assessed the pit was too large and we filled in the bottom with several inches of dirt. We did not want ware to be too high in the pit to avoid cracking from quick cooling. Or, too low so it would not burn sufficiently.
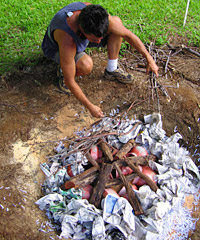
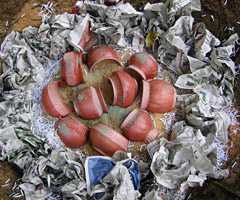
Packing the ware
 First we packed a layer of sawdust maybe six inches deep. Then, we packed all of the pieces in a circular arrangement, close but not touching. We choose to lay our pieces on the side in the sawdust. Any part of the pots which contacts the sawdust turns black from the exposure to carbon. So if you wanted a black line around the foot of the piece, you would stand it up, if you wanted the black line around the neck of the piece, you'd place it upside down. When we laid the pieces on the side, we put sawdust inside the pieces up to about the same level as on the outside. First we packed a layer of sawdust maybe six inches deep. Then, we packed all of the pieces in a circular arrangement, close but not touching. We choose to lay our pieces on the side in the sawdust. Any part of the pots which contacts the sawdust turns black from the exposure to carbon. So if you wanted a black line around the foot of the piece, you would stand it up, if you wanted the black line around the neck of the piece, you'd place it upside down. When we laid the pieces on the side, we put sawdust inside the pieces up to about the same level as on the outside.
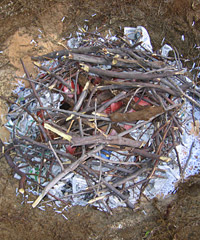
Adding the special ingredients & building the fire
Next, we sprinkled a small amount of the copper carbonate over the pottery, then a small amount of rock salt. The copper and salt should produce a chemical reaction creating flashes of greens and reds. We added a layer of sawdust maybe 4 - 6 inches deep over the pots, built a nest of shredded paper around that and added small kindling and eventually medium sized logs in a campfire fashion on top of all of the pots.
|
|
|
Pit-fire
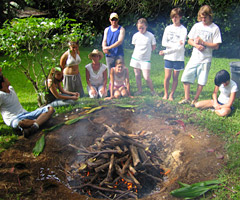
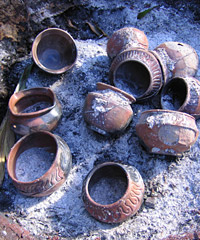
We lit the fire from four corners to encourage uniform heating. We let the fire burn for several hours and covered it with a piece of sheet metal overnight since rain was anticipated. We were surprised at how clean the fire burned. The next day it was ready to unload.
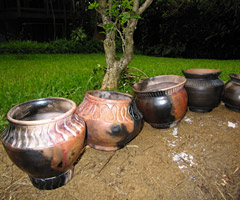
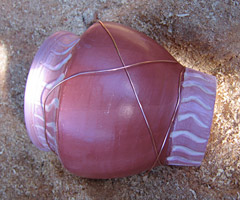
Results
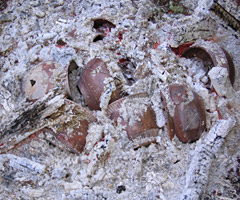
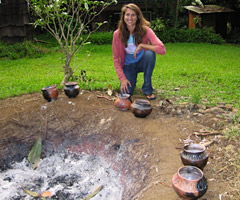 We were fortunate to get rich colors and shine with flashes of reds and greens. We had tied some copper wire around some of the pots to see if we'd get a reaction from the copper and we did. We were inspired by a David Kuraoka show at the Honolulu Academy of Arts in the summer of 2006. He filled two walls with large (10 x 16 inch) burnished and pit-fired tiles. It was a large installation, maybe 40 on one wall and 80 on another and one technique he used throughout was tying copper wire around the tiles where we would get flashes of lustry greens. A friend who took David's workshop commented, "Yeah well, he probably had to make 800 tiles to get those 80 since so many break." This set my expectation for a ten percent success rate, although this varies widely, we got sixty percent success. Of ten pieces, four cracked and six were fully intact and with beautiful colors. We speculated that adding the red iron oxide to both recipes helped achieve the rich oranges, reds and pinks and will continue to experiment. We were fortunate to get rich colors and shine with flashes of reds and greens. We had tied some copper wire around some of the pots to see if we'd get a reaction from the copper and we did. We were inspired by a David Kuraoka show at the Honolulu Academy of Arts in the summer of 2006. He filled two walls with large (10 x 16 inch) burnished and pit-fired tiles. It was a large installation, maybe 40 on one wall and 80 on another and one technique he used throughout was tying copper wire around the tiles where we would get flashes of lustry greens. A friend who took David's workshop commented, "Yeah well, he probably had to make 800 tiles to get those 80 since so many break." This set my expectation for a ten percent success rate, although this varies widely, we got sixty percent success. Of ten pieces, four cracked and six were fully intact and with beautiful colors. We speculated that adding the red iron oxide to both recipes helped achieve the rich oranges, reds and pinks and will continue to experiment.
Finishing
Once the pieces are cool, you can wipe them clean and use a finishing wax. We used a Minwax product called finishing wax. We brushed it on sparsely with a soft toothbrush to get in the textured areas but had to be careful not to chip away the surface so we also used a soft towel. Then, the shine was amazing and the finish was so unique. It made my cone ten glazes seem so shiny and even gaudy!
As I get exposed to more firing techniques I appreciate the wide range of finished ware potters can contemplate making. Pit-firing using the techniques of burnishing and applying terra sigilatta is a labor intensive process which you probably need to enjoy considering the relative 'un'success rate. Since the results are so unique and so primitive looking and feeling, many, including me will gladly explore.
|
©2005-2008 MauiPotter.com
|
|